How To Install the TOUGH GUN CA3 Gun Connector and Unicable in Place of The Legacy TOUGH GUN G1 Series MIG Gun
- Remove the nozzle, retaining head and liner (parts not shown).
- Loosen the neck clamp SHCS using a 5 mm Allen wrench (see ‘A‘ in Figure 1).
- Remove the neck (see ‘B‘ in Figure 1).

- Loosen the 2x SHCS in the gun mount using a 5 mm Allen wrench (see ‘C‘ in Figure 2).
- Remove the old TOUGH GUN G1 Series unicable (see ‘D‘ in Figure 2).

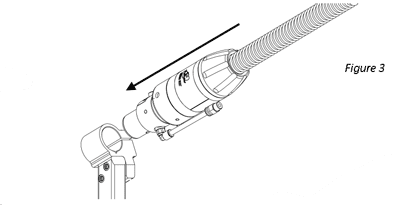
- Line up the key of the new TOUGH GUN CA3 MIG Gun housing with the keyway in the gun mount and insert the new unicable connector and unicable into the gun mount as shown in Figure 3.

- Tighten the 2x SHCS in the gun mount using a 5 mm Allen wrench (see Figure 4).

- Line up the key of the neck with the keyway in the unicable connector and install as shown in ‘E‘ of Figure 5.
- Tighten the neck clamp SHCS using a 5 mm Allen wrench (see ‘F‘ in Figure 5).
- Install and trim a new QUICK LOAD™ Liner, and reinstall the consumables.
