Implementing a Robotic Welding System: 5 Common Questions Answered
Estimated reading time: 7 minutes
Many manufacturing operations want to improve productivity and weld quality. Robotic welding can often help achieve these goals. But success with a welding robot doesn’t happen by chance. It takes a lot of upfront planning to help minimize the time and money you need later to make improvements or fix issues.
Before getting started, consider how these common questions could impact the way you establish a repeatable and consistent robotic welding operation — and how you can get the most out of it.
A: The filler metal used in a robotic welding system plays a critical role, as it can affect productivity, weld quality and overall costs. When you choose a wire for robotic welding applications, consider two things: the type and the thickness of the material being welded.
Across various industries, solid wire has been the standard for robotic welding. However, metal-cored wire may offer better productivity and higher quality benefits, especially for manufacturers of heavy equipment, automotive exhaust, chassis and wheels. Metal-cored wire not only allows for faster travel speeds and higher deposition rates, but it also more effectively controls spatter levels to reduce post-weld cleanup. Last, it offers improved welding through mill scale, which helps eliminate pre-weld grinding.
When in doubt, you can get suggestions from experienced welding equipment and filler metal manufacturers to help you match a welding wire to your process needs.
A: Performance in a robotic weld cell is significantly affected by your choice of robotic welding gun and consumables, including the nozzle, contact tip and liner. The right combination of gun and consumables can reduce unplanned downtime, increase lifespan and improve overall equipment effectiveness (OEE) in your weld cell.
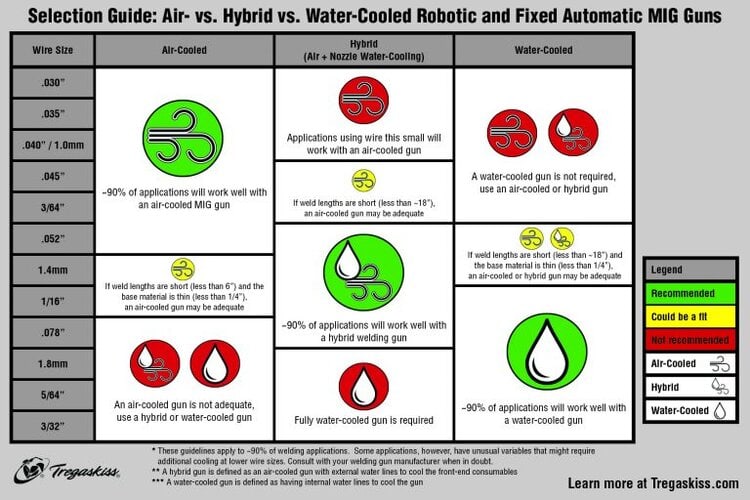
There are three types of robotic guns to choose from, depending on your duty cycle and amperage ratings: air-cooled, water-cooled and hybrid. It’s possible for air-cooled guns to reach ratings of 350 to 385 amps at 100% duty cycle with mixed gases. Guns with this rating are well-suited for a variety of applications and help eliminate the need for water-cooled guns, which can be more complex and expensive to maintain. However, hybrid air/water-cooled designs incorporate water cooling on the front of the neck with an air-cooled cable. This design is good for applications with borderline air-cooled duty cycles that experience a higher frequency of consumable changeover. The hybrid gun is the best option to provide an additional rating boost while effectively cooling the consumables, leading to longer lifespans.
Robotic welding systems typically operate at higher duty cycles (compared to semi-automatic welding) and may use transfer modes that can be harsh on consumables. Consider using heavy-duty copper or chrome zirconium contact tips or high-quality tips designed specifically for pulsed welding. Chrome zirconium contact tips resist physical wear (or the keyholing effect) better than copper tips and are ideal for applications with long welds. Make sure to undersize the contact tip from the wire size when using 500-pound-plus wire drums to help ensure consistent wire contact with the tip due to the wire cast. Keep the tips on par with the wire size in small wire packaging.
Nozzle material also plays a factor in the application. Brass nozzles are stronger and have a lower spatter adhesion compared with copper, but brass is more brittle at higher temperatures. In short, brass handles spatter best while copper best handles higher heat.
Choosing a quality liner pays dividends in reducing your unplanned downtime. The majority of time, burnback in contact tips is a direct result of poor wire feeding or a liner cut too short. An accurately trimmed, quality liner will help to consistently improve wire feeding by reducing drag. The result is longer-lasting contact tips and improved robot uptime.
A: Several factors, such as material type, wire size and material thickness, influence the proper weld settings for an application. Some welding power sources have the ability to suggest recommended parameters based on the operator’s input for the application.
When a machine doesn’t have this technology, finding the correct parameters can involve some trial and error on your part to dial in heat and penetration. Consult with the robot manufacturer, welding power source manufacturer or system integrator. These partners can offer expertise and assist in choosing and testing specific materials to establish the proper weld parameters.
A: Establishing an accurate tool center point provides consistency and repeatability across parts and is vital for your system to maintain quality welds.
You can set your own standards for the acceptable amount of TCP drift based on the application and type of welds being made. To set the tolerance of TCP variation, an acceptable starting point can be half of the thickness of the wire diameter. Also keep in mind that your TCP correlates with your contact tip wear — the more key-holed a tip, the more off location your TCP will be.
Touch-sensing features that monitor TCP and track any shifts from the original setting are available on many robotic systems today. If a gun is out of acceptable TCP range, you can remove the neck and recalibrate it to the original specifications with a neck-straightening fixture. TCP can also be automatically adjusted internally by the robot on some systems.
It’s a good idea to schedule regular TCP checks. For example, it can be done every weld cycle, at the end of every shift or when the gun goes through a reamer cycle. The frequency of TCP checks is a matter of your priority preference. While it can be time-consuming to check after every shift, in the long run it can save money by avoiding rework if problems are caught early.
A: Much like programming the weld settings, programming the robot path may also involve some trial and error. When you initially program the robot’s path, think about four factors: the application, the material type, the welding process you are using and the gap size being filled. The travel angle — and whether it’s a push or pull weld — will impact the weld quality and aesthetic. Dialing in the correct path to achieve your desired results can take time.
Having the robot move to perch points or ready-to-enter points once the home positions are set helps to keep the robot safely away from potential collision areas. It also allows the system to move with air-cut moves to and from these points quickly and effectively.
When you program the robot to move to a weld, it’s common to set the approach point just above the weld start location. The robot should approach the start location at a slower and safer speed before it strikes an arc. This approach position provides a good lead-in and typically does not require adjustment unless the weld is relocated. Some robotic systems have technology that assists in setting the initial robot path.
The robot’s welding location can play a role in premature gun failures. Heavy articulation in the gun or an excess of +/-90 degrees, especially during welding, can cause accelerated cable failures. Minimizing your robot’s axis five and six during welding can help extend gun life by reducing wear.
Tips for robotic weld cells
Many variables, including proper cable and consumables selection and TCP control, play an important role in weld quality and gaining successful results with a robotic welding system. Establishing a thorough plan before implementation and continuing to monitor key issues can help you optimize your OEE so you can get the most out of your investment.